set up Google Tag Manager (and track anything in Google Analytics)
tl;dr: Manage your website events and pixels easily in one place
cost: $0
time: 15 minutes
Google Tag Manager is the most approachable¹, most scalable², and most commonly used 'event' management system for a budding website/webapp. It is free and can be easily³ shared with non-technical collaborators once it has been set up.
¹²³ These are opinions. You'll see once you set it up.
Here's how this article goes:
- add code snippets to your site's HTML
- familiarize with the UI
- set up a tag
- connect Google Analytics
- advanced concepts and gotchas
#1 - code snippets
#1.1 - go here and click Start For Free
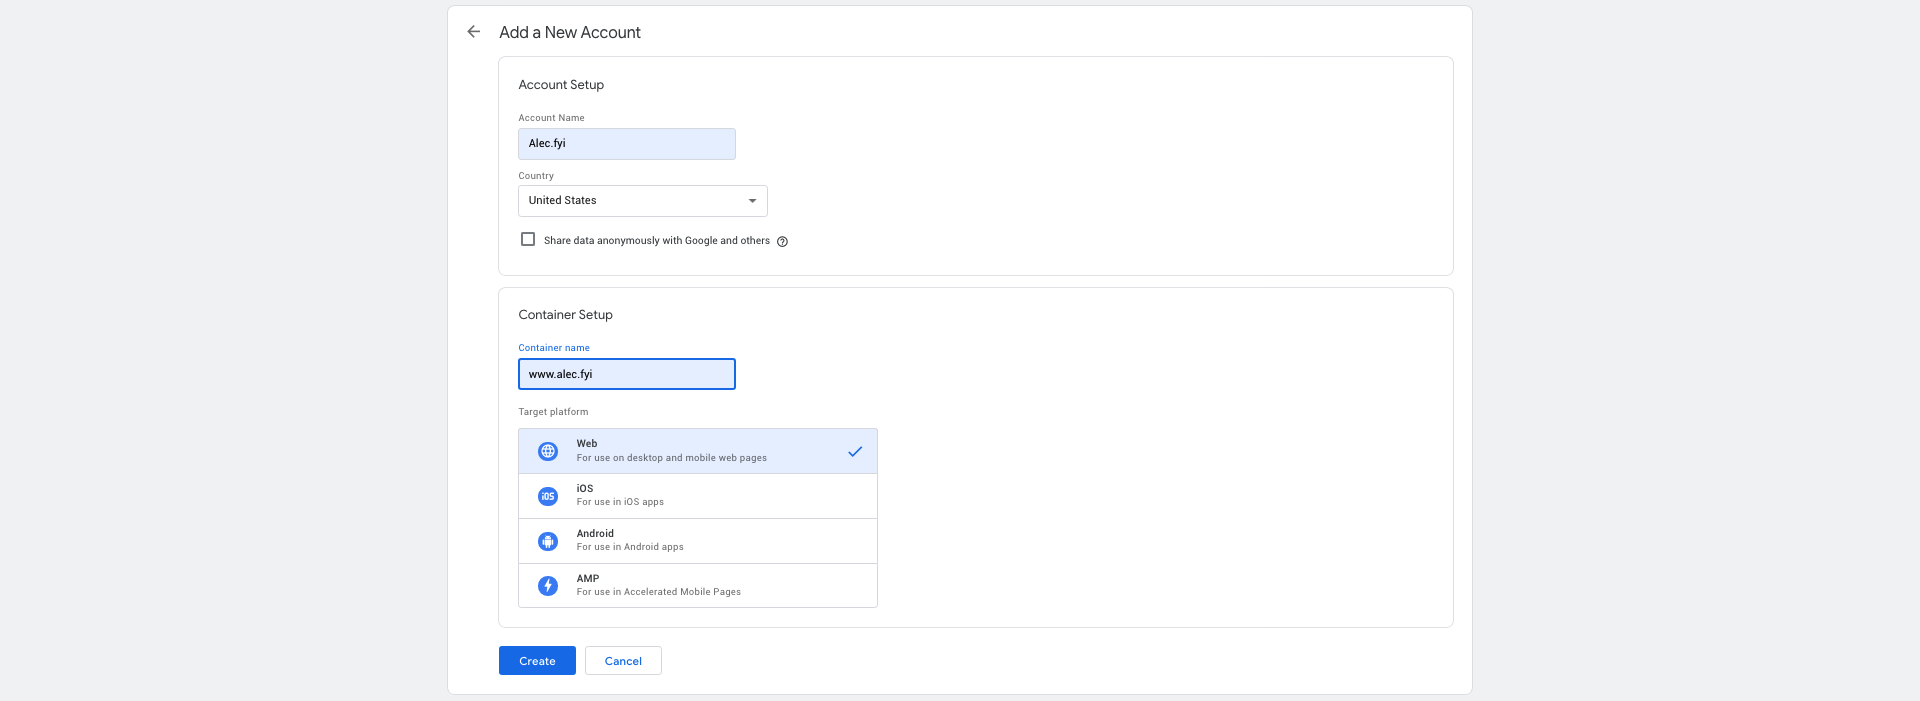
#1.2 - set up the account, container, and agree to the EULA
#1.3 - add the two snippets - one in the <head>, and one in the <body>

It's totally fine to share your Google Analytics and Tag Manager snippets - anybody who visits your site can see them with Inspect Element!
#1.4 - redeploy your site and check the snippets are in the HTML
(we'll check that the GTM UI is connected in step #2.4)
#2 - familiarize
there is admittedly kinda a lot going on in the Google Tag Manager UI. To cover the basics:
#2.1 - labeled UI
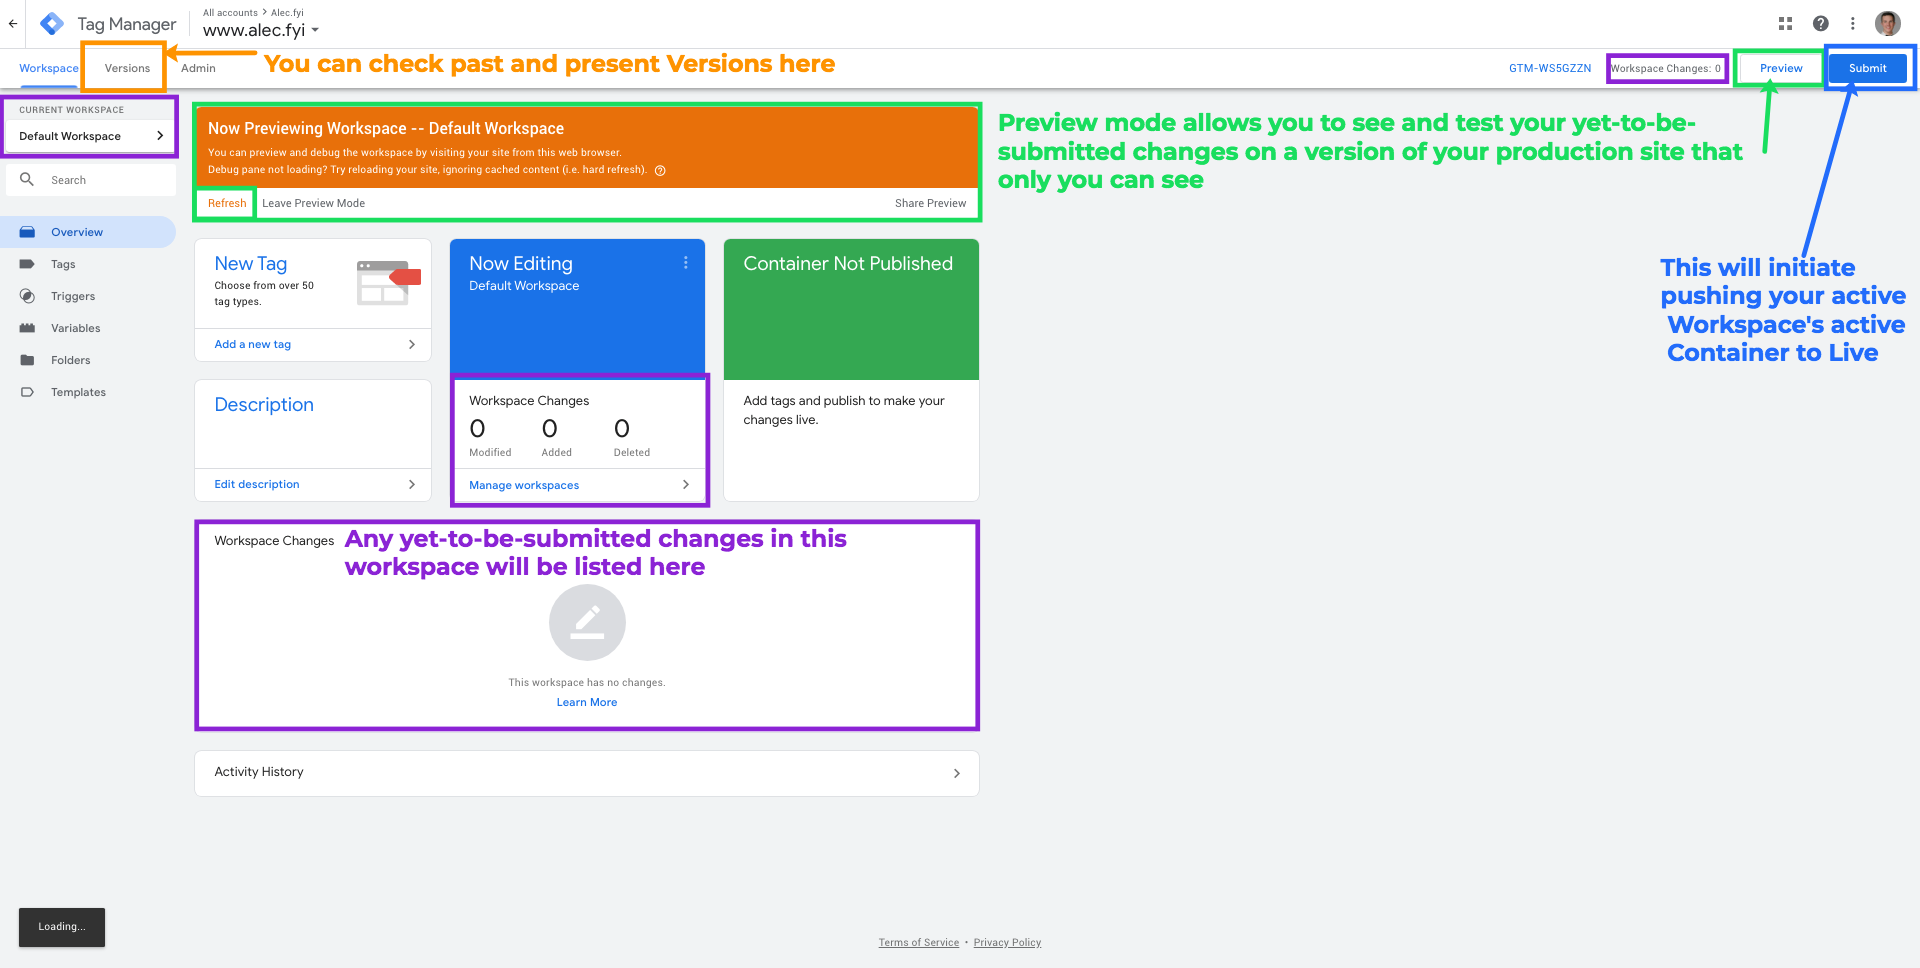
(you can right click -> Open Image In New Tab to see this fullscreen)
#2.2 - core concepts:
- Triggers
- Something that causes a Tag to be fired or a Variable to be updated
- Tags
- A specific action <> reaction coupling.
- All pixels (e.g. for ad platforms) are implemented as Tags.
- An example: a user starts checkout with an active cart
- -> Trigger InitiateCheckout activated
- -> Tag Facebook InitiateCheckout (aka FB Checkout pixel) fires
- -> the event is sent to Facebook
- Variables
- Helps to maintain state between actions (via the DataLayer)
- An example: a user submits their email to a newsletter opt-in and later checks out as a guest
- -> Trigger NewsletterSubscribe activated
- -> update Email variable in the DataLayer
- -> Which triggers GuestCheckout activated
- -> it inherits the Email variable from the DataLayer
#2.3 - structural concepts:
- Manager Accounts
- Just 1 - the account you set up in #1.2
- Containers
- Just 1 - maps to the website you're setting this up for
- Inside of Manager Accounts
- Workspaces
- Up to 3 (free tier) - analogous to Github branches. Allows multiple users to simultaneously test potential changes.
- Inside of Containers
- Environments
- Latest - the latest version (changes automatically)
- Live - what’s actually on the site right now
- Versions
- Any time one or more changes are submitted, a new version is created. Analogous to Github PR's
- You can revert to previous Versions
#2.4 - preview mode
Go ahead and hit Preview (in green in top right in the above image) to enter Preview Mode. Once in Preview Mode, navigate to your site in a new tab (in the same browswer). Turn off any and all adblockers, tracking-blockers, javascript-blockers, and the like. You should see something like this at the bottom of your screen:

If that pane showed up, congratulations, you've set up Google Tag Manager! You can exit Preview Mode or publish your current Container to get the pane to go away.
#3 - tags and triggers
#3.1 - trigger setup
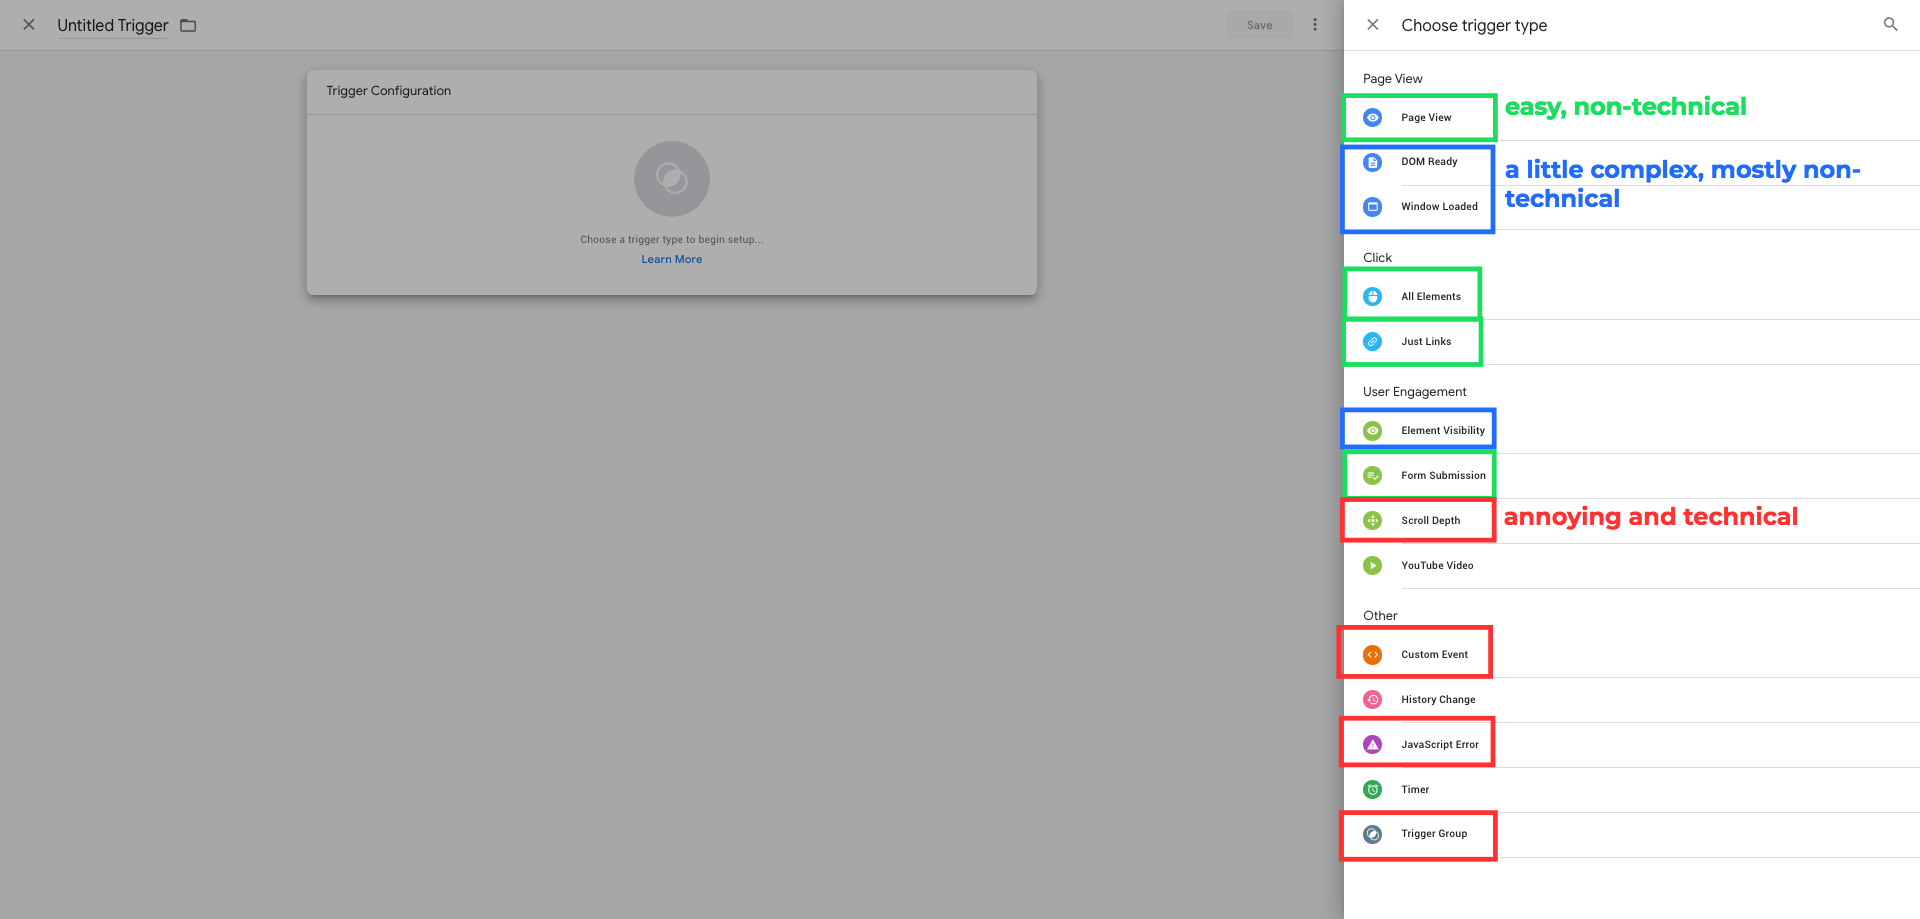
Navigate to the Trigger pane on the left sidebar, and then click New.
I have color categorized the various types of Triggers for your viewing pleasure.
#3.2 - let's create a trigger
Let's create a specific trigger. Maybe I want to track how many people click to my About page. Since there's a link to the About page from every page (via the header and sidebar), this trigger will be present and triggerable on every page.
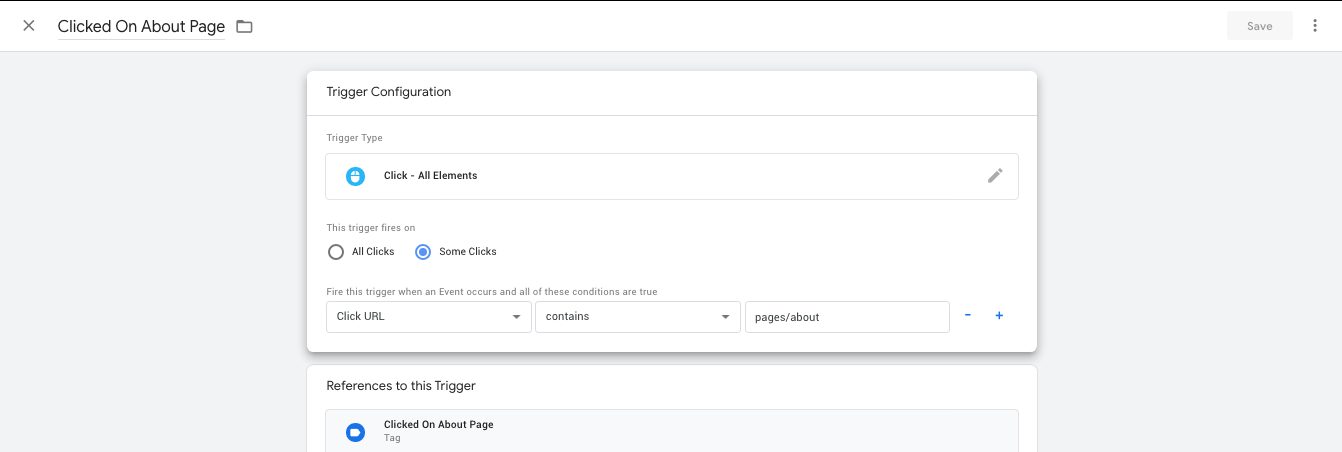
You can use the +/- symbols on the right side to add stacking trigger requirements (ex: Click URL contains pages/about AND On-Screen Duration >= 5 seconds). Other common Trigger actions include Form Text, Form Classes, and Click Element.
#3.3 - tag setup
Navigate to the Tag pane on the left sidebar, and then click New.
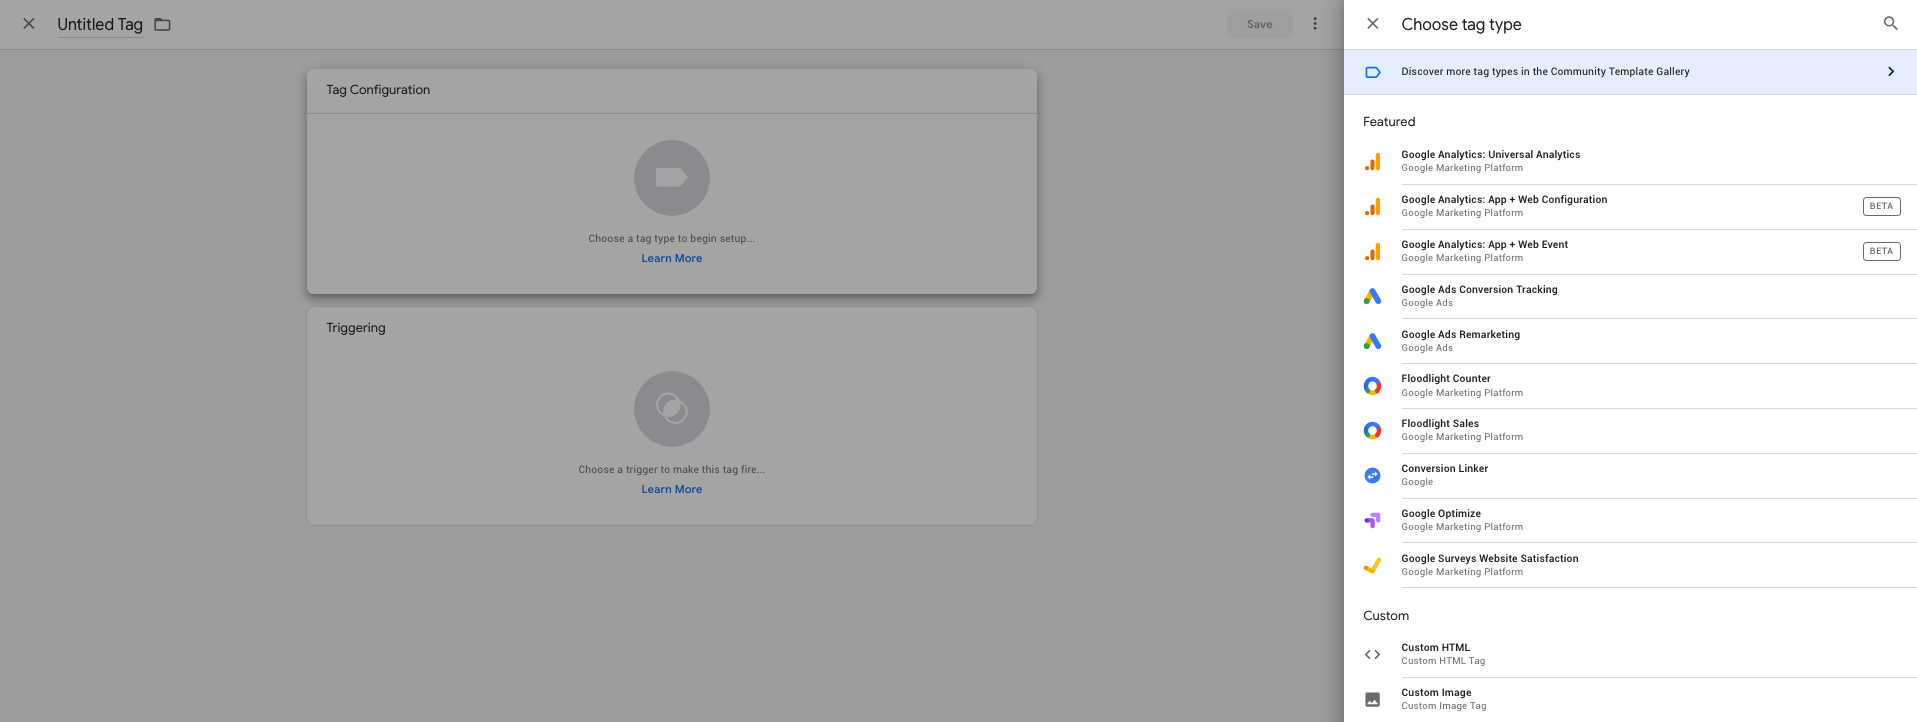
Tags have Configuration (what happens when it fires) and Triggering (what causes it to fire). As you can see on the left, there are some default options. You will notice Facebook conspicuously absent, because Google is petty. You can implement every non-natively-supported pixel or event with Custom HTML (or Custom Image if they give you an <img> tag and you have no other choice)
#3.4 - connect GA to GTM
Navigate to the Variables pane on the left sidebar, click create a new User-Defined Variable, and select Google Analytics Settings. Enter the Tracking ID (found in Tracking Info -> Tracking Code of your GA Admin) as shown below. You'll only need to do this once.

#3.5 - let's create a tag
Once you've set up the connection, you should be able to quickly put together new tags that map directly into GA.
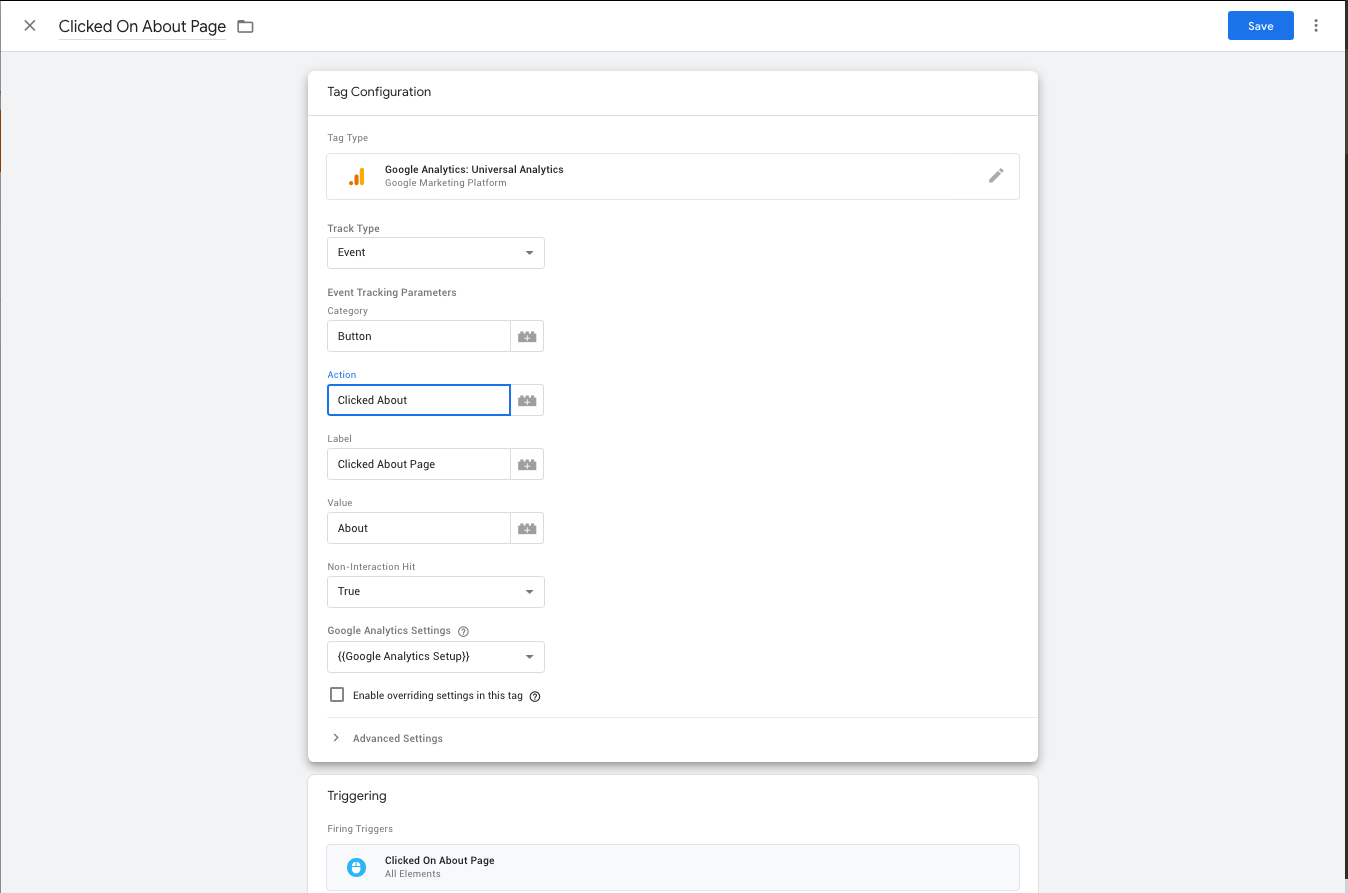
#3.6 - test the trigger and tag
Go into Preview Mode and complete the action you're intending to track with the Tag. If it's a link click, use Open In New Tab (CMD + Click on Mac), as navigating to a new page will refresh the Actions Summary.
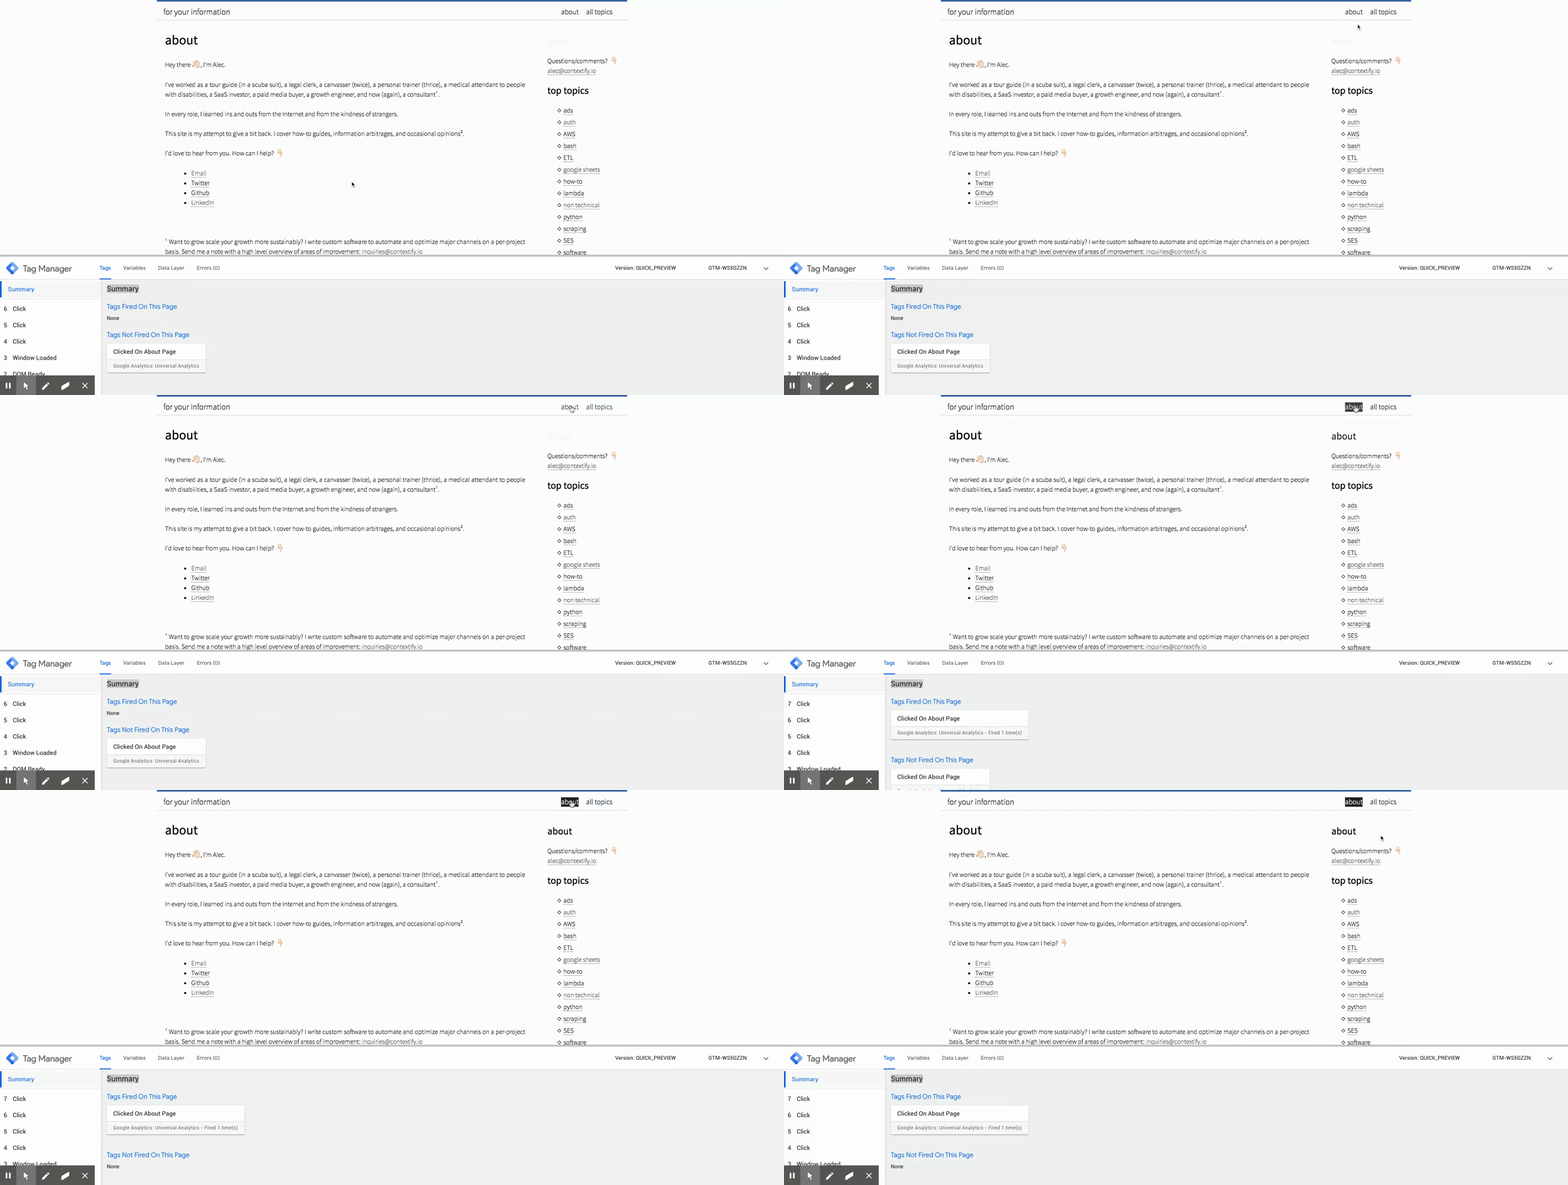
I'll be honest, I'm not sure why the GIF is strobing out like that. Email me alec@contextify.io if you have thoughts.
#4 - GA
#4.1 - check in RealTime
Navigate to Google Analytics -> Reports -> Realtime -> Events.
You will see a tracker at the bottom that shows Events in the Last 30 minutes. You should see your event listed.

#4.2 - create custom GA goal
Navigate to Google Analytics -> Admin -> Goals -> + NEW GOAL
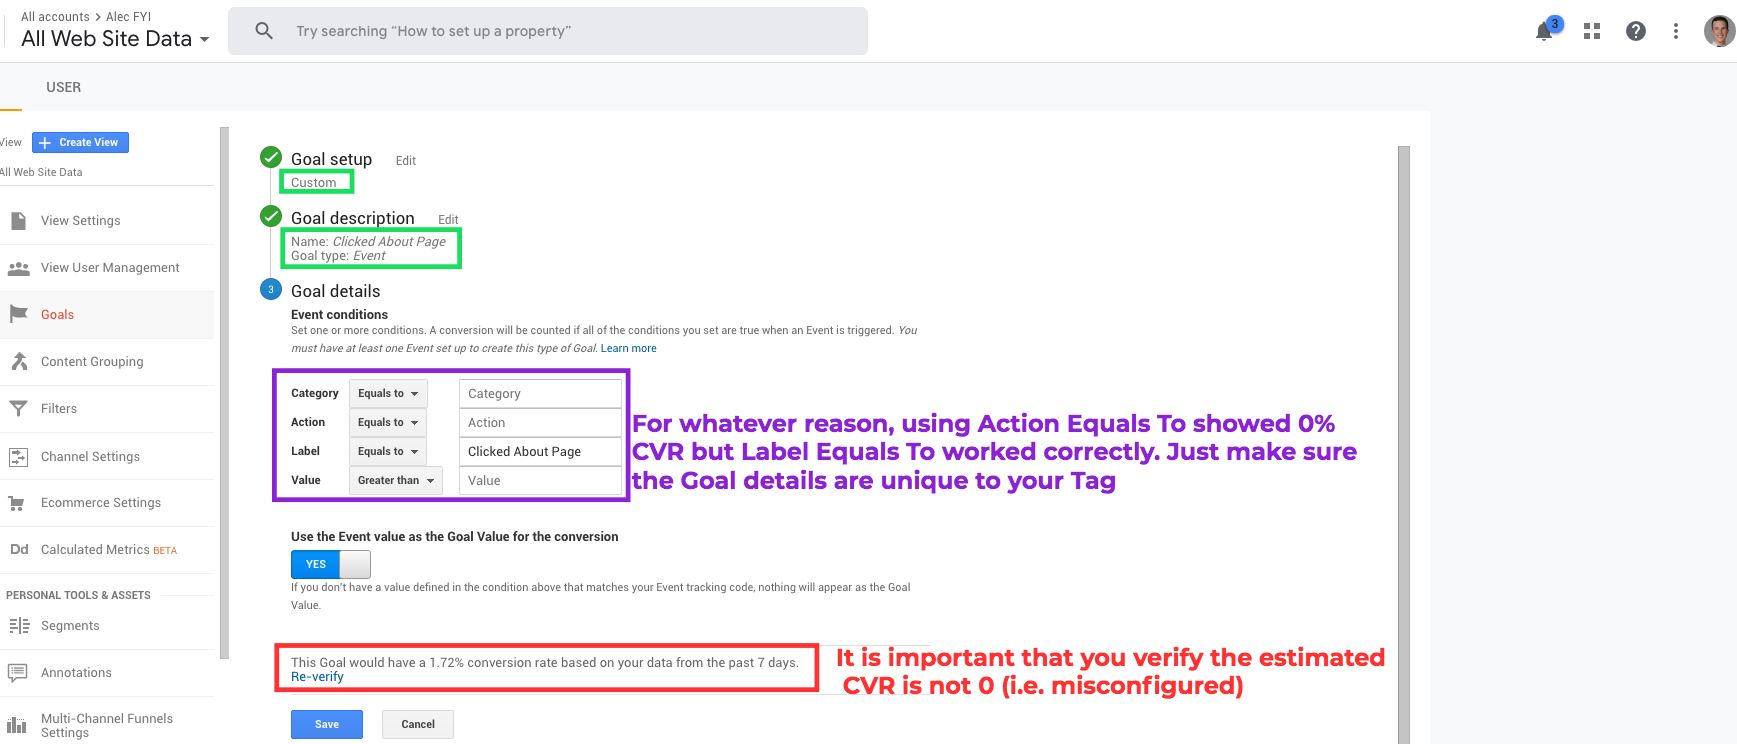
Note: the Goal Details are additive, meaning EVERY included condition must be true for the Goal to register.
#4.3 - add to GA Custom Report
Let's say you want to see how different cohorts of users split by traffic source behave around that goal. Go to Customization -> Custom Reports -> + New Custom Report. You can find your Custom Goals under Behavior.
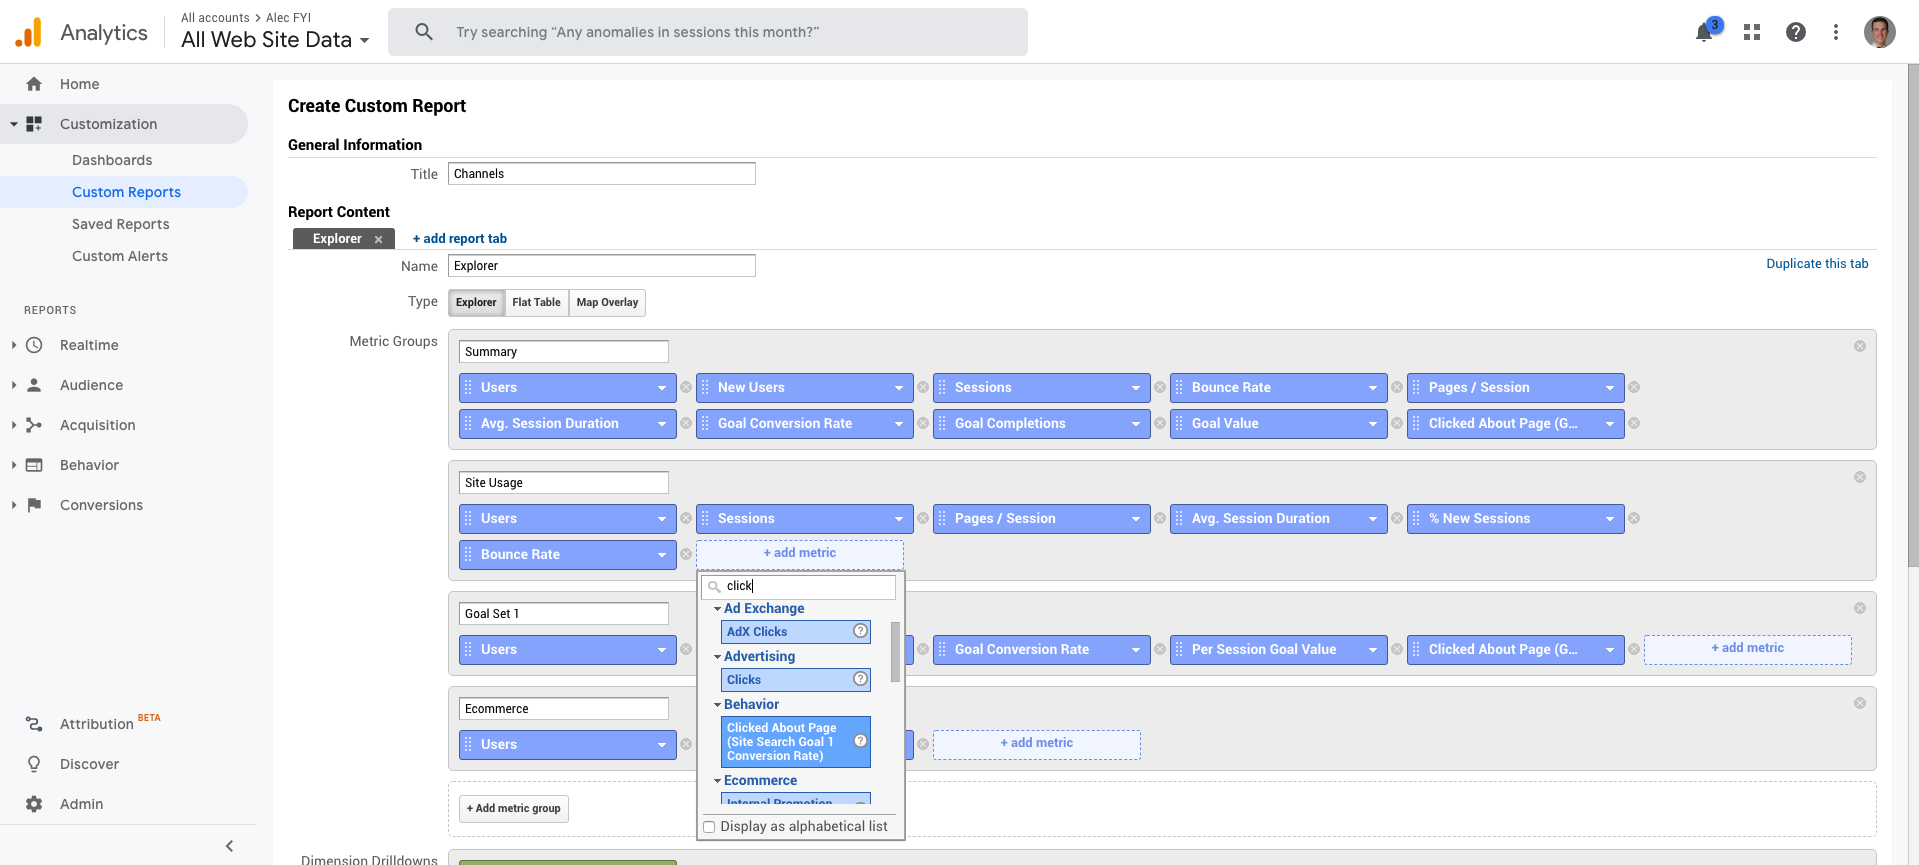
Nice. You're more or less done now. You can continue to create more and more granular Tags, Goals, and Reports to your heart's content.
#5 - advanced
While in Preview Mode, you can push events via the Chrome DevTools console that will Trigger Tags. A good example of this is testing a Purchase trigger, when you don't have a test account that can 'purchase' for 'free'.
dataLayer.push({ event: 'Order Completed' })
Tags can send additional information if you so choose. A good example is the Facebook Pixel, which can include purchase value, currency, a subscription ID, and more. The below snippet is the Tag Configuration.
<script>
  fbq('track', 'StartTrial', {
    value: 9.95,
    currency: 'USD',
    subscription_id: { eventID: String({{Invoice_ID}}) },
  });
</script>
Facebook has its own Events Manager suite. It, like GTM, is a walled garden, designed to force you to trust their infrastructure and accounting. GTM is better, so use it to implement everything, including FB pixels.
Thanks for reading. Questions or comments? 👉🏻 alec@contextify.io